Frankly, the mixer introduced first in Hauptwerk 5 (similar in Hauptwerk 6, 7, 8) is probably the most tortuous piece of software I have ever met. It is very powerful, but it can hardly be understood by a human being. It took me about 2 months to understand its functionalities. Hauptwerk user manual was of some help, but even reading it 3 times over, I still could not understand the fundamental concept of the mixer, and therefore I could not really master it. A simple advice helped me to finally get the insight.
I share this simple advice with you:
Imagine a river flow. Imagine the audio stream "flowing" through the mixer from one dialog window to another, until it finally gets to the audio output into your headphones or speakers. To understand the mixer, follow the flow of the audio!
![]()
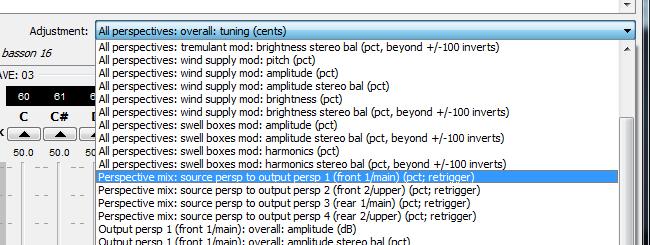
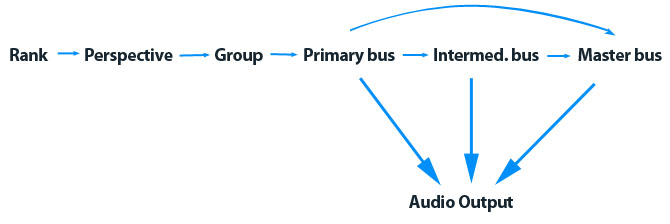
Start with the Rank voicing. You can simultaneously route any rank to up to 4 paths called "perspectives". You can see these four paths in the rank routing dialog box as "Perspective mix: source persp to output persp 1-4".
With the slider, you can send the audio there fully (100%) or attenuated (anything between 1-99) or you can stop the audio flowing into a perspective (0).
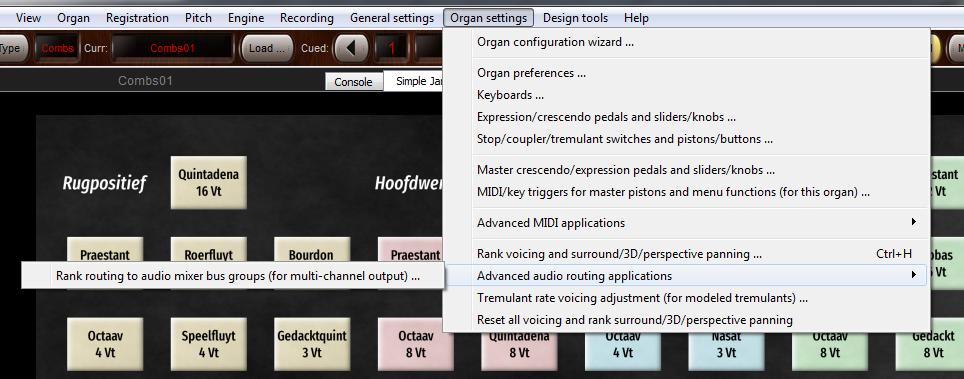
Now, your audio flows into the desired "perspective", what is the next? You can attach one so called "group" to each perspective. Invoke "Rank routing to audio mixer bus groups" from the Organ settings. (It is masterfully hidden inside the "Advanced audio routing applications" entry.) Set the "Destination mixer bus group" for any desired perspective, for any desired rank (or for all ranks together). The groups have sometimes enigmatic names, such as "Outp perspctv 4 (rear 2/upper)". Do not worry about that. It is just a name. You can rename it to "My lovely group" or anything you prefer.
The next step is to tell, where does the audio flow from the "group". Invoke the groups dialog from General settings. Again, playfully hidden in the "Advanced audio routing applications", but this time not in the Organ settings but in the General settings menu. Is not that cute? And you can see immediately that each group can send the audio to one or many buses. The "primary bus" is the next room your audio will flow into. You can tick as many "primary buses" for each group as you need. Hauptwerk will divide the audio stream evenly into each of them according to the Bus allocation algorithm which you could set earlier, if you knew you wanted to do it (back in the Rank Routing to Audio Mixer). This is useful if you wish to split your ranks to a C - C# side, for example, or split the rank in any other way, so that each pipe, or group of pipes gets its own speaker. If you do not want to split your rank, let the group have only one single primary bus, all the audio will flow into it.

Then, invoke the "Audio mixer" from the General settings to attach buses to audio outputs (finally!), the audio flows from the primary bus to the master bus (via intermediary bus if desired - I never used this). Use the "Sends" check boxes to make the connection between the primary and the master bus. Finally, you can attach the desired audio output to the primary bus, or to the master bus, as you wish. The audio stream has reached the end of its path. Oh, this is also the place where you may add a Sonus Paradisi impulse response to generate the convolution reverb. The reverb is applied to a bus (primary, intermediary or master), so that the audio stream flowing through it gets richer if desired.
The audio path through Hauptwerk 5 overview:
This article is ment to give the oveview of the audio flow through Hauptwerk, it contains severe simplifications useful to get the insight, but for specific applications, see the Hauptwerk user manual. And, I forgot to mention, for some simple applications, such as listening through your headphones, you do not even need to touch the mixer. It will work out-of-the-box.